Understanding the history of the transfer process and the paper used should help you make better transfers.
When, more than thirty years ago, I first developed the transfer techniques for which the image transfer paper I sell is used, I was using images from magazines. When I wanted to create my own images, I photocopied them onto the blank areas of magazine pages. Because this limited the sizes of the images I could work with, I searched for blank paper for making transfers.
The search was arduous. Magazine paper was only available in very large rolls, far too heavy to manage without a fork lift. Eventually I found a source of paper which would work with laser printers and copiers, Realizing that folks who had studied with me would also want it, I packaged it and sold it.
This worked well for a few years but then the mill which made the paper which I was using and selling discontinued it. I had to start my search again. Eventually I found paper that worked. But it still only worked with laser copiers and printers. And many folks had asked for paper which would work with inkjet as well.
Finding a paper which would work with both laser and inkjet printers and copiers proved to be difficult. Papers made for inkjet are very different from papers made for laser printers. For transfers, the inkjet ink used has to be waterproof when dry. Finally, around 2015, I found a paper that worked well for both and started selling it as "Multi-use Acrylic Image Transfer Paper".
Note: I make my transfer images exclusively with monochrome (black) laser printers or copiers. Why? Because toner is particulate and therefore toner-based transfer images are more predictable. If I want to make colored transfers, I paint my monochrome transfers with acrylic paint before I apply them. Instructions for this are included in my book "Acrylic Image Transfer - A Handbook for Artists."
A few months ago, in late 2020, the multi-use paper I was using and selling was discontinued by the mill which made it. Hesitant to go through the time-consuming search process again, I almost decided to stop selling transfer paper altogether. But recently I have found another source of paper which, while designed for laser output, also works with most inkjet output. But please know that my tests have been run with an Epson printer using pigmented DuraBrite Ink. I have not tried other waterproof inks and and cannot be certain how the paper will handle them.
The instructions for using the Acrylic Image Transfer Paper appear below. If you have specific questions about your printer or copier, you are welcome to call me at 845-258-4620 (East Coast Hours Please) or email me at jonathan@talbot1.com.

February 16, 2021

INSTRUCTIONS FOR USING ACRYLIC IMAGE TRANSFER PAPER FOR ARTISTS
2. Coat the face of the image with gloss acrylic medium. (See Note 2 below). Do not coat the back of the image.
3. Coat the surface which is to receive the image with gloss acrylic medium. (See Picture 2 below)
4. Allow both surfaces to dry.
5. Affix the image face-down to the receiving surface by gluing down with additional acrylic medium or by the iron and release paper method.* If using wet adhesive allow to dry thoroughly (up to 12 hours). (Not Pictured)
6. Remove Transfer Paper by rubbing with wet woven cotton cloth wound around a finger tip. Dip in water to remoisten as needed. (See Picture 3 below) A plastic scrubbing pad (e.g. a "Dobie" pad) can also be used.
7. Image will remain. Background will show through. (See Picture 4 below)
8. After Transfer Paper has been removed, apply another coat of medium to equalize surface sheen. (Not Pictured)
Note 2: IMPORTANT! If using inkjet output you must allow ample time for the ink to dry (1 hour or more) before applying the medium.
Note 3: This image transfer method creates a mirrored ("reversed" or "flopped") version of the image. If it is important to retain the original orientation of the image (such as when there is type in the image), A) Use appropriate computer software to create a reverse or mirrored image and then transfer it to regain original orientation or B) make intermediate film transparency, place film “right reading” side up on photocopier glass, and copy onto transfer paper. The image on the transfer paper will then be reversed but will regain proper orientation when transferred.
Note 4: Images made with toner produce more opaque transfers but the colored toner of most colored laser copies is subject to fading. Black toner normally contains carbon and will last. Some (but not all) inkjet inks will last for more than 100 years. Check the specifications of the toner or ink your printer or copier uses.

| Picture 1: The image to be transferred (in this case the Mona Lisa) has been photocopied onto transfer paper. Its face (but not its back) has been coated with gloss acrylic medium. |
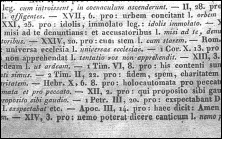
| Picture 2: The receiving surface (in this case a piece of paper with text printed on it). Its face has also been coated with gloss acrylic medium. |
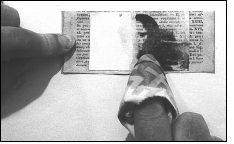
| Picture 3: After the transfer has been glued or ironed down (image side down), the transfer paper is washed or rubbed away with a wet cloth wrapped around a finger tip. A plastic scrubbing pad (e.g. "Dobie pad") can also be used. |
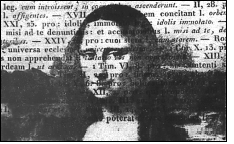
| Picture 4: The transferred image in place on the receiving surface. No transfer paper remains and the background shows through the transferred image. Note that the Mona Lisa is reversed or flopped. |